Paper revisions are a regular part of the job for many academics: you submit a manuscript and a few months later you get responses from a number of reviewers with their opinion and suggestions for improvements (although not always framed as such!). If the overall opinion of the paper leans towards positive, you are generally invited to revise and resubmit the manuscript.
While the initial phase of writing an academic manuscript may not be easily captured into individual todo items, this is often possible for the reviewing process. Recently, I found myself with collaborators who were all familiar with Git and GitHub, so I decided to try and manage the revision process through GitHub issues. Of course this also works on BitBucket, GitLab, etc. This worked very well, so in this post I will describe how I did it and how you might do this for your own projects. This process can even be followed if you don’t have collaborators who are familiar with Git/GitHub. The key idea can be summarized as follows:
Every comment raised by a reviewer that needs to be addressed has a corresponding issue on GitHub, issues are labelled by section and organized in a milestone, and revisions of the paper are managed through pull requests (PRs).
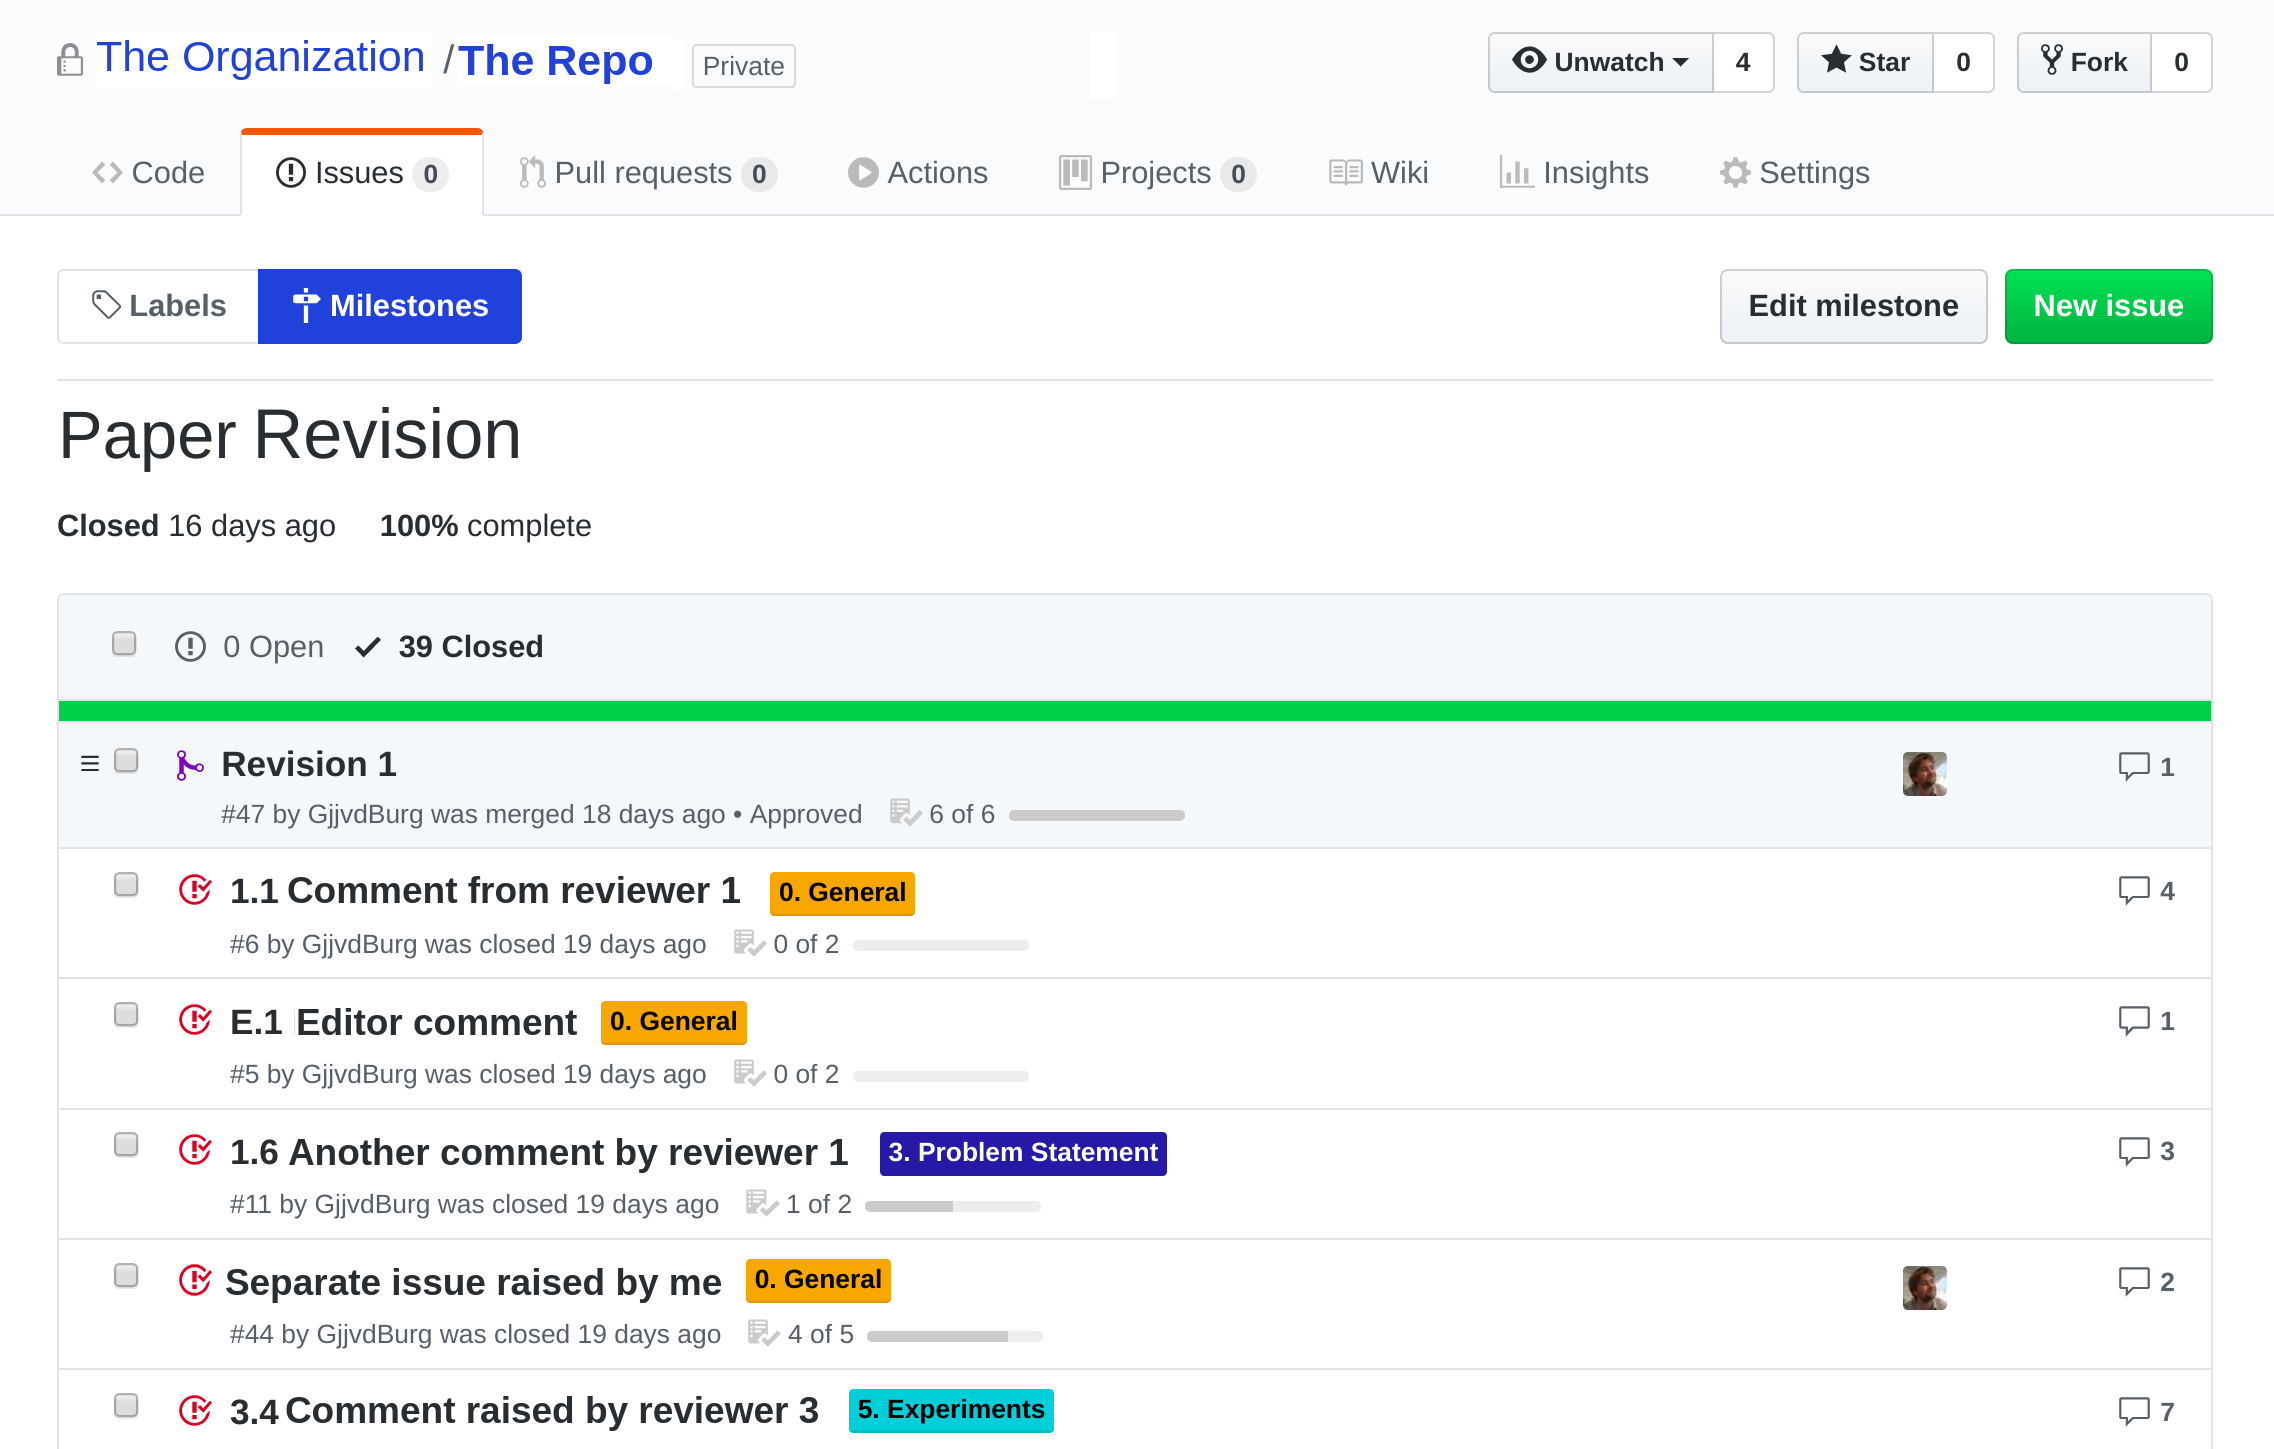
Here’s a screenshot illustrating the idea:
Setting up
If you haven’t done so already, create a Git repository for your manuscript and add it to GitHub. I’ll assume your manuscript is written in a format that allows tracking with version control (LaTeX, Markdown, etc.). Start by using a Git tag to mark that this is the original version of the submitted manuscript: In the future, you’d of course do this when you first submit the manuscript!
$ git tag -a v1.0 -m "initial version submitted to <journal>"
When you receive the reviews for your manuscript and have taken the appropriate amount of time to calm down and discuss them with your collaborators, you can start on the revised version and the response to the reviewers. I recommend creating a separate Git branch for the entire revision process:
$ git checkout -b revision_1       # create the branch for the revision
$ git push -u origin revision_1    # push the branch to GitHub
I also made this the default branch on the repository during the revision process, so that all pull requests are automatically created against this branch.
Identifying Issues
The next step is to identify issues raised by the editorial team that need to be addressed. I like to be organized in my responses to reviewers and use a LaTeX template that I made where I can mark each individual point that needs a response:
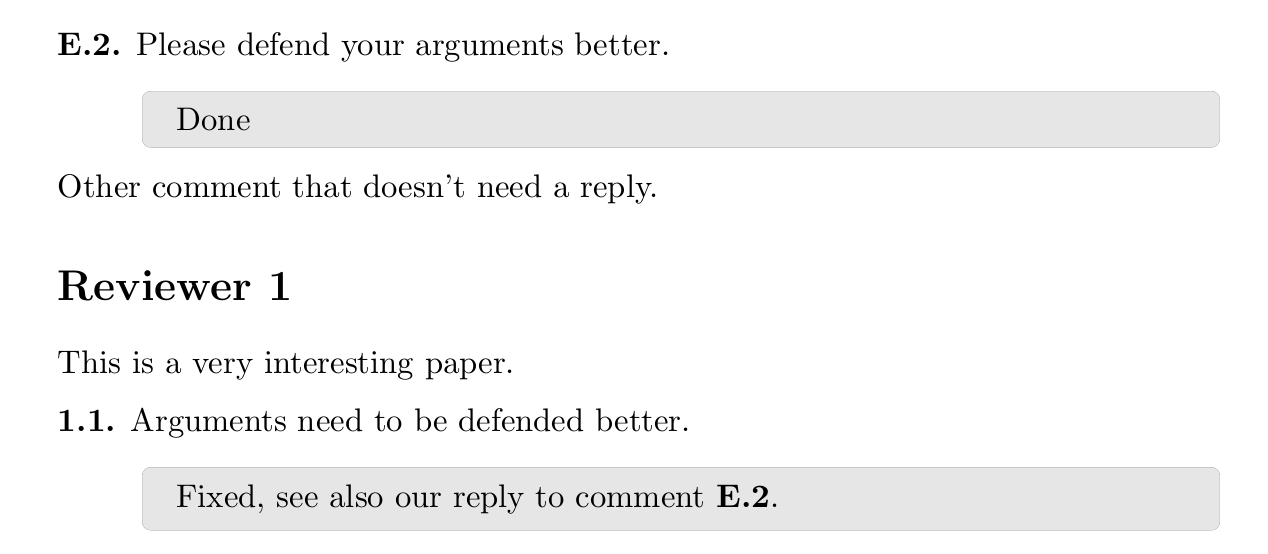
With this template comments by the editor are numbered E.1, E.2, etc.,
and those by reviewers are numbered 1.1, 1.2, etc. for Reviewer 1 and
2.1, 2.2, etc. for Reviewer 2. So before I start working on a
revision, I add all editor and reviewer comments to this template and mark
each point that needs to be addressed with the \point command of the
template (see the
repo for more
details). This reply letter should also be added to the Git repository.
After identifying all the points that need to be addressed, it’s time to create the corresponding issues on GitHub. I used an issue template, available here, that includes a checklist with the following items: 1) issue addressed in paper, and 2) issue addressed in reply letter. This helped keep an overview of whether or not each issue was appropriately addressed. The title of each issue started with the number used in the reply letter (1.1 etc) and then a short description of the issue. Of course the content of the issue contained the reviewer comment copied verbatim.
Next, I categorized all issues by the section of the paper that they refer to,
using colorful labels. Label names start with the section number for easy
sorting. For general issues I used a separate “0. General” label. See the
above screenshot for an illustration. For reviewer comments that overlapped
with each other I added a comment on the issue along the lines of: “overlaps
with #12”. This made it easier to identify the actual points that needed to
be fixed. All issues were then added to a
milestone, which was
given a deadline (one week before the revision was actually due!).
Addressing issues
While you may want to address each comment individually, I found it quite useful to address the issues by section of the paper. The labels added to the issues helped a lot with this, since the GitHub interface allows you to filter issues by label. Before starting work on a revised section, I created a branch for the revision of that section:
$ git checkout revision_1       # ensure you're on the revision branch
$ git checkout -b rev/intro     # create branch for the intro revision
I then started editing the section to address the reviewer comments, creating
commits as I did so. When something needed to be discussed with collaborators,
the issue on GitHub provided a convenient location (as you can see from the
above screenshot, this was quite common). After I finished revising a section,
I created a pull request on GitHub with the changes, and invited one of my
collaborators to review it. This usually led to some more commits on the
branch of the PR, until it was eventually merged into the revision_1
branch.
Remember that you can close issues with
keywords
on GitHub, so you can close all issues for a section by merging the
corresponding PR.
A nice feature was that we could discuss
my revised section in the comments for the PR, which is still available to all
collaborators (and me in the future!).
This process continued until all issues raised by the editorial team were
addressed in both the manuscript and the reply letter. In the end, all these
changes were in the revision_1 branch, which in my case included about 120
commits for 30 issues.
The big merge
When you’re done processing all the issues, it’s time for one final pull
request: that of revision_1 against master. This PR includes all the
changes that have been made for the revised manuscript. You may want to ask
all collaborators to review and approve this PR, so that it’s clear everyone
has seen it. If there are any comments at this stage, you and your
collaborators can simply commit to the revision_1 branch. In our case,
this final PR had some last things that needed to be discussed and I used a
small checklist in the description to organize these items.
As a final step, the revision_1 branch can be merged back into the
master branch, to finalize the revision process:
$ git checkout master        # switch back to master
$ git merge revision_1       # merge revision_1
Finally, tag the revised manuscript for future reference:
$ git tag -a v2.0 -m "revised version submitted to <journal>"
Conclusion
I found the workflow described above incredibly useful during the recent revision of a paper and hope to use it again in the future. By creating separate issues for each of the points that need to be addressed, everyone was on the same page about what needed to be done. Of course, having a central location for both the manuscript, reply letter, and the issues also saved a lot of emails, which is always a good thing!